
Your analyzer already knows the result.Stop typing it in again.
The Labgen Bridge is a small Windows program that sits on the PC beside your analyzer. It reads what the machine sends and files each result against the matching patient — keyed by the barcode on the tube, never by name.
Runs on Windows 10 or 11. About fifteen minutes to set up.
Without interfacing
- A technician reads values off the analyzer screen.
- They type them into the report, one parameter at a time.
- A transposed digit in a potassium result looks exactly like a real one.
- Every CBC costs minutes that nobody has during a morning rush.
With the Bridge
- The analyzer finishes a run and sends its result.
- The Bridge matches the tube barcode to the waiting order.
- Values land in the report already filled in, flagged against the patient's own reference range.
- A pathologist verifies and releases. Nobody retypes anything.
Four steps, and no command line
Everything happens in a window. There is one address for every lab, so there is nothing to look up and nothing to type but six digits.
MSH|^~\&|XQ-320|HAEM LAB|LABGEN|LAB|20260924143012||ORU^R01|MSG00021|P|2.3.1
PID|1||SAMP-88214||SHARMA^PRIYA||19910714|F
OBR|1|SAMP-88214||CBC^Complete Blood Count|||20260924142955
OBX|1|NM|WBC^WBC||7.42|10*3/uL|4.0-11.0|N|||F
OBX|2|NM|RBC^RBC||4.88|10*6/uL|3.8-5.2|N|||F
OBX|3|NM|HGB^Haemoglobin||13.6|g/dL|12.0-15.5|N|||F
OBX|4|NM|HCT^Haematocrit||41.2|%|36.0-46.0|N|||F
OBX|5|NM|PLT^Platelets||256|10*3/uL|150-400|N|||F
OBX|6|NM|MCV^MCV||84.4|fL|80.0-100.0|N|||F
PRIYA SHARMA · Sample SAMP-88214 · Complete Blood Count
| WBC | 7.42 | 10³/µL | 4.0 – 11.0 |
| RBC | 4.88 | 10⁶/µL | 3.8 – 5.2 |
| Haemoglobin | 13.6 | g/dL | 12.0 – 15.5 |
| Haematocrit | 41.2 | % | 36.0 – 46.0 |
| Platelets | 256 | 10³/µL | 150 – 400 |
| MCV | 84.4 | fL | 80.0 – 100.0 |
- 1
Add the analyzer in Labgen
Open Machine Interfacing, choose your make and model, and give it a name like “Main lab XN-350”. - 2
Install the Bridge on the lab PC
One installer, on the PC next to the analyzer. It registers a background service that starts with Windows, so nobody has to remember to open anything in the morning. The installer finishes by opening the setup window for you. - 3
Type the 6-digit code
Labgen shows a pairing code. Type it into the window and press Connect. That single code identifies your lab and this analyzer, which is why there is no address, username or key to enter. - 4
Point the analyzer at the PC
In the analyzer's own settings, set its output host to that PC's IP address. Run one sample to confirm. This is the only step that changes your existing setup, and it is the last one — so nothing is disturbed until you are ready.
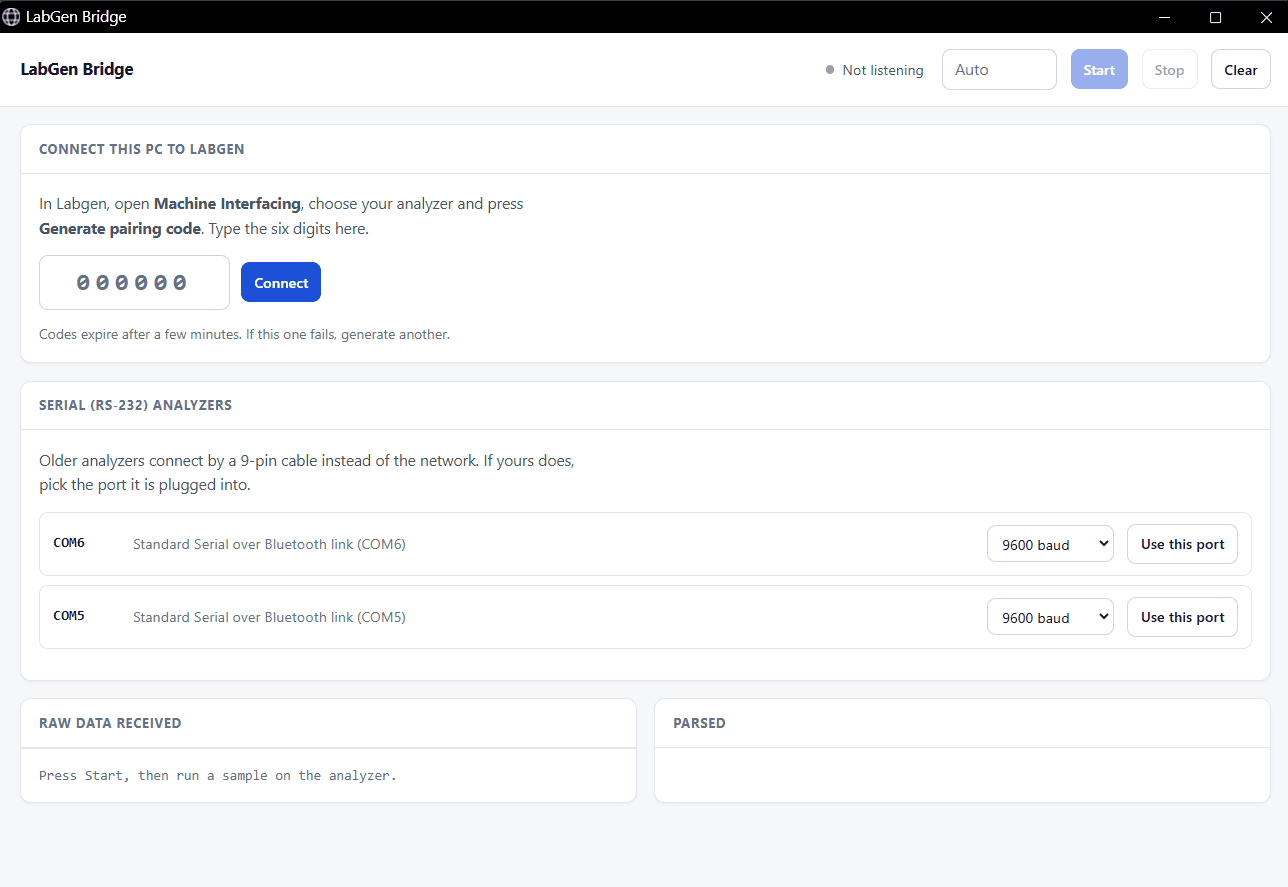
When it doesn't work, you can see why
An analyzer that won't talk usually has one of three problems, and from a dashboard they look identical: another program is holding the port, the machine is pointed somewhere else, or it speaks a dialect we haven't met. The built-in tester shows the raw message exactly as the machine sent it — including messages nothing can read, which is the case you most need to see.
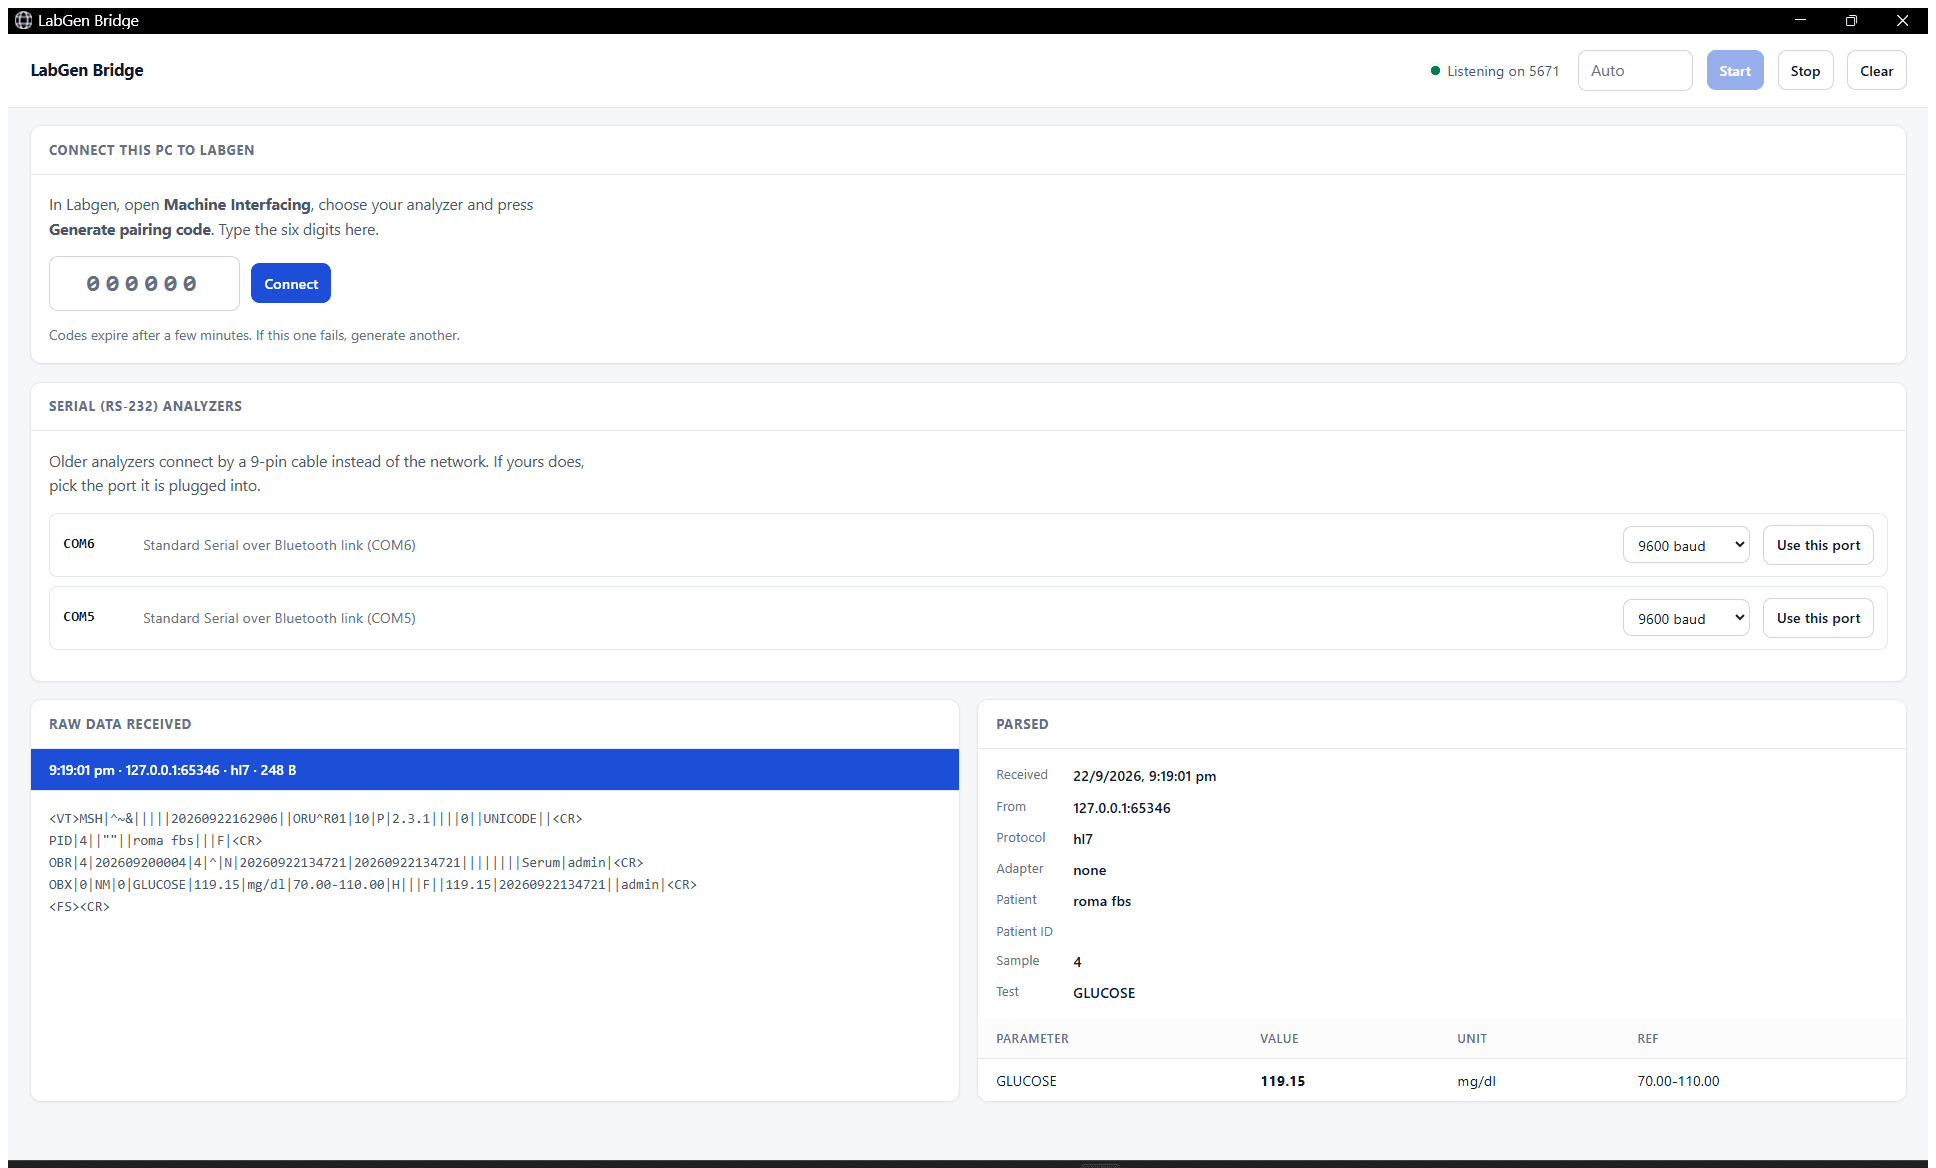
The same view is available inside Labgen under Machine Interfacing → Diagnostics, so somebody who understands the instrument can watch a machine they are nowhere near. Nothing shown there is stored: it is a live view, not a record.
Built for the machines labs actually own
Ethernet analyzers
HL7 v2.x and ASTM E1394 over TCP/IP — Sysmex XN and XQ series, Mindray BC, Beckman, Roche cobas, and most instruments that speak either protocol. Machines that wait to be connected to, rather than sending on their own, work too: enter the analyzer's address and the Bridge dials it.
Serial analyzers
Older RS-232 machines connect by cable. The Bridge lists the COM ports on the PC by the same names Windows shows, so nobody has to dig through Device Manager.
Internet outages
Results are written to disk on the lab PC first and forwarded when the connection returns. An outage delays a report; it does not lose one.
No shared passwords
Pairing mints a token for that one PC. Nothing is typed twice, nothing is emailed around, and a device can be re-paired at any time without touching the others.
Runs by itself
A background service starts with Windows and keeps running. Updates install themselves. The window is only there when somebody needs it.
Verified before release
Machine results never publish themselves. They arrive filled in and wait for a pathologist to check and authorise, with the whole trail recorded.
How a result finds its patient
The tube carries a barcode. The analyzer reads it and sends it back with the result, and the Bridge matches on that — never on a patient's name, which two people in one day can share.
Print barcodes from Labgen, or scan your own pre-printed stickers into the entry and use those. Either way the match is by the string on the tube.
It is not discarded and it is not guessed at. It waits in the Unmatched list with its values intact, where a technician assigns it to the right patient in two clicks.
Connect your first analyzer this week
If your analyzer speaks HL7 or ASTM — and nearly all of them do — it will connect. See plans and pricing.